Unternehmenswiki mit Outline
Outline ist ein modernes Wiki welches On-Premise mittels Docker installiert werden kann.
Warum Unternehmen ein eigenes Wiki benötigen
Für Unternehmen wird es immer wichtiger das Wissen über zunehmend komplexere Arbeitsabläufe in einem eigenen Wiki-System zu sammeln, zu organisieren und mit den eigenen Mitarbeitern zu teilen.
Richtlinien, Verfahren und interne Vorschriften können Dokumentiert werden und sind für alle Mitarbeiter einsehbar und können jederzeit aktualisiert werden.
Ein gut gepflegtes Wiki erleichtert auch das Onboarding von neuen Mitarbeitern und das Wissen von ausscheidenen Mitarbeitern geht nicht vollständig verloren.
Dabei sollte das Wiki von Anfang an gut strukturiert aufgebaut werden und gute Wikis bieten eine leistungsstarke Such- und Navigationsfunktion für das schnelle auffinden von Informationen.
Welche Kriterien für uns entscheidend sind
- Betrieb auf eigenen Servern, On-Premise aufgrund dort gespeicherten Informationen
- Modernes Design
- Leichtgewichtig und nicht überladen mit unzähligen Funktionen die wir nicht benötigen
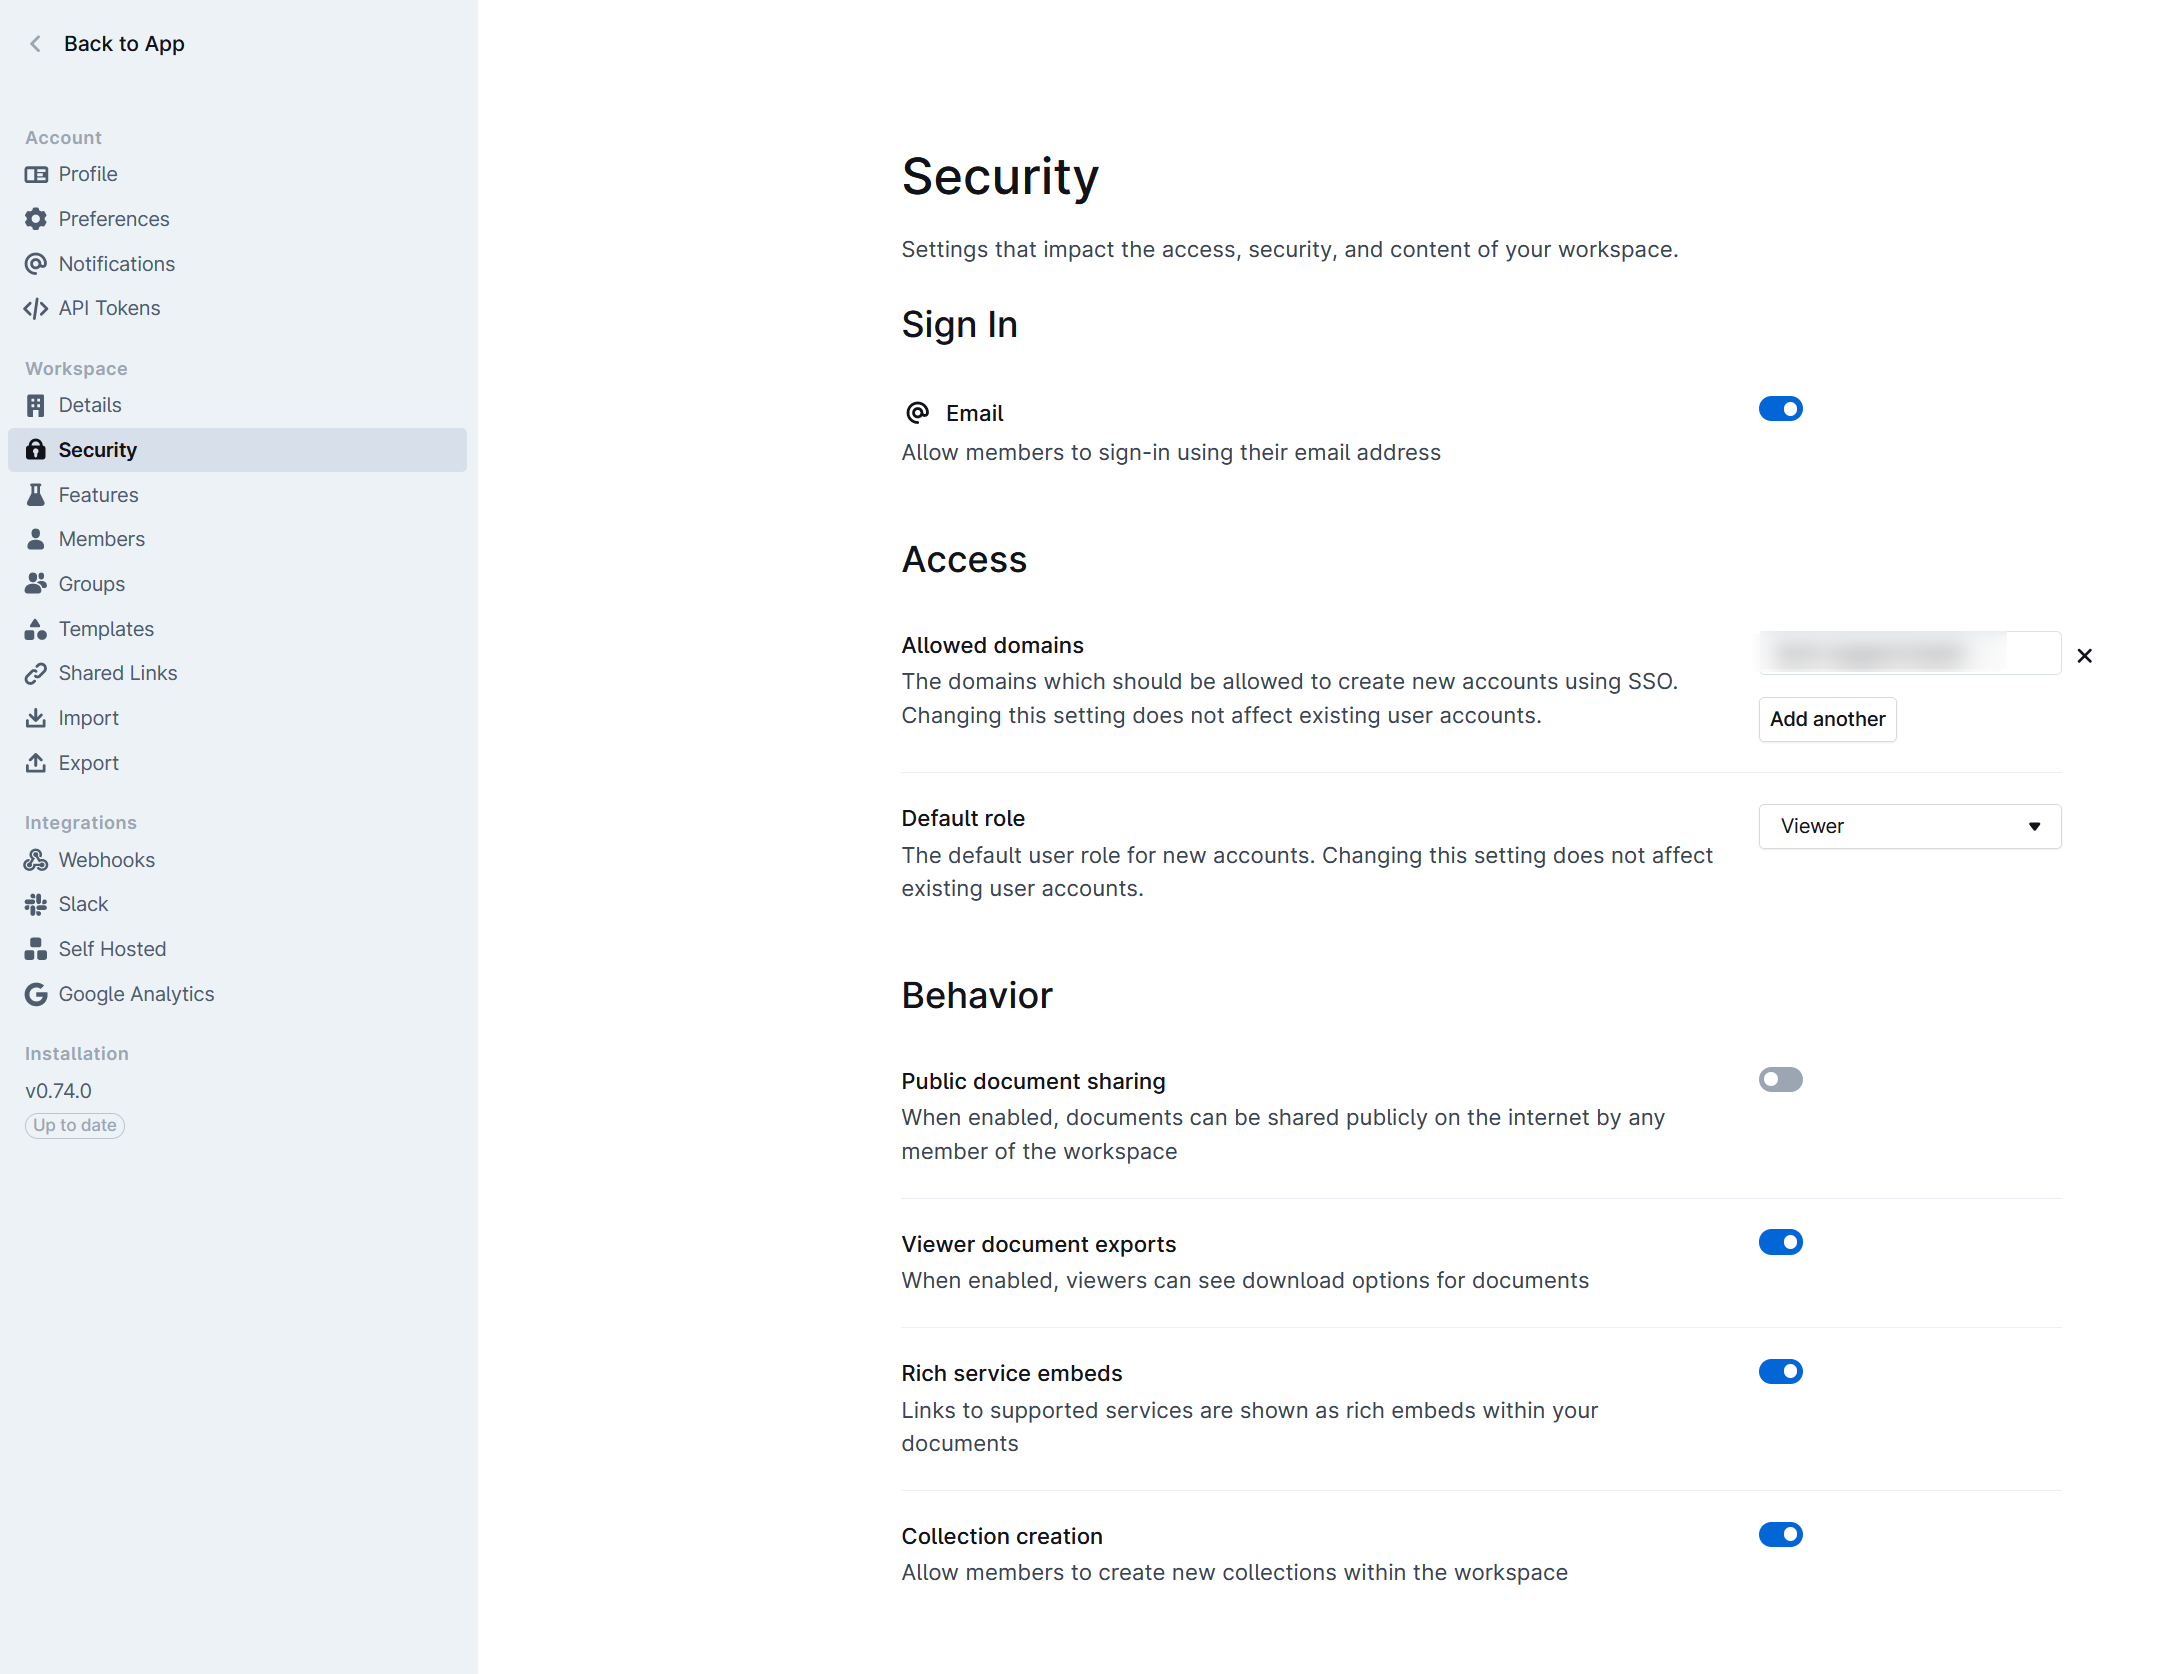
- Rechtemanagement mit Usern und Gruppen
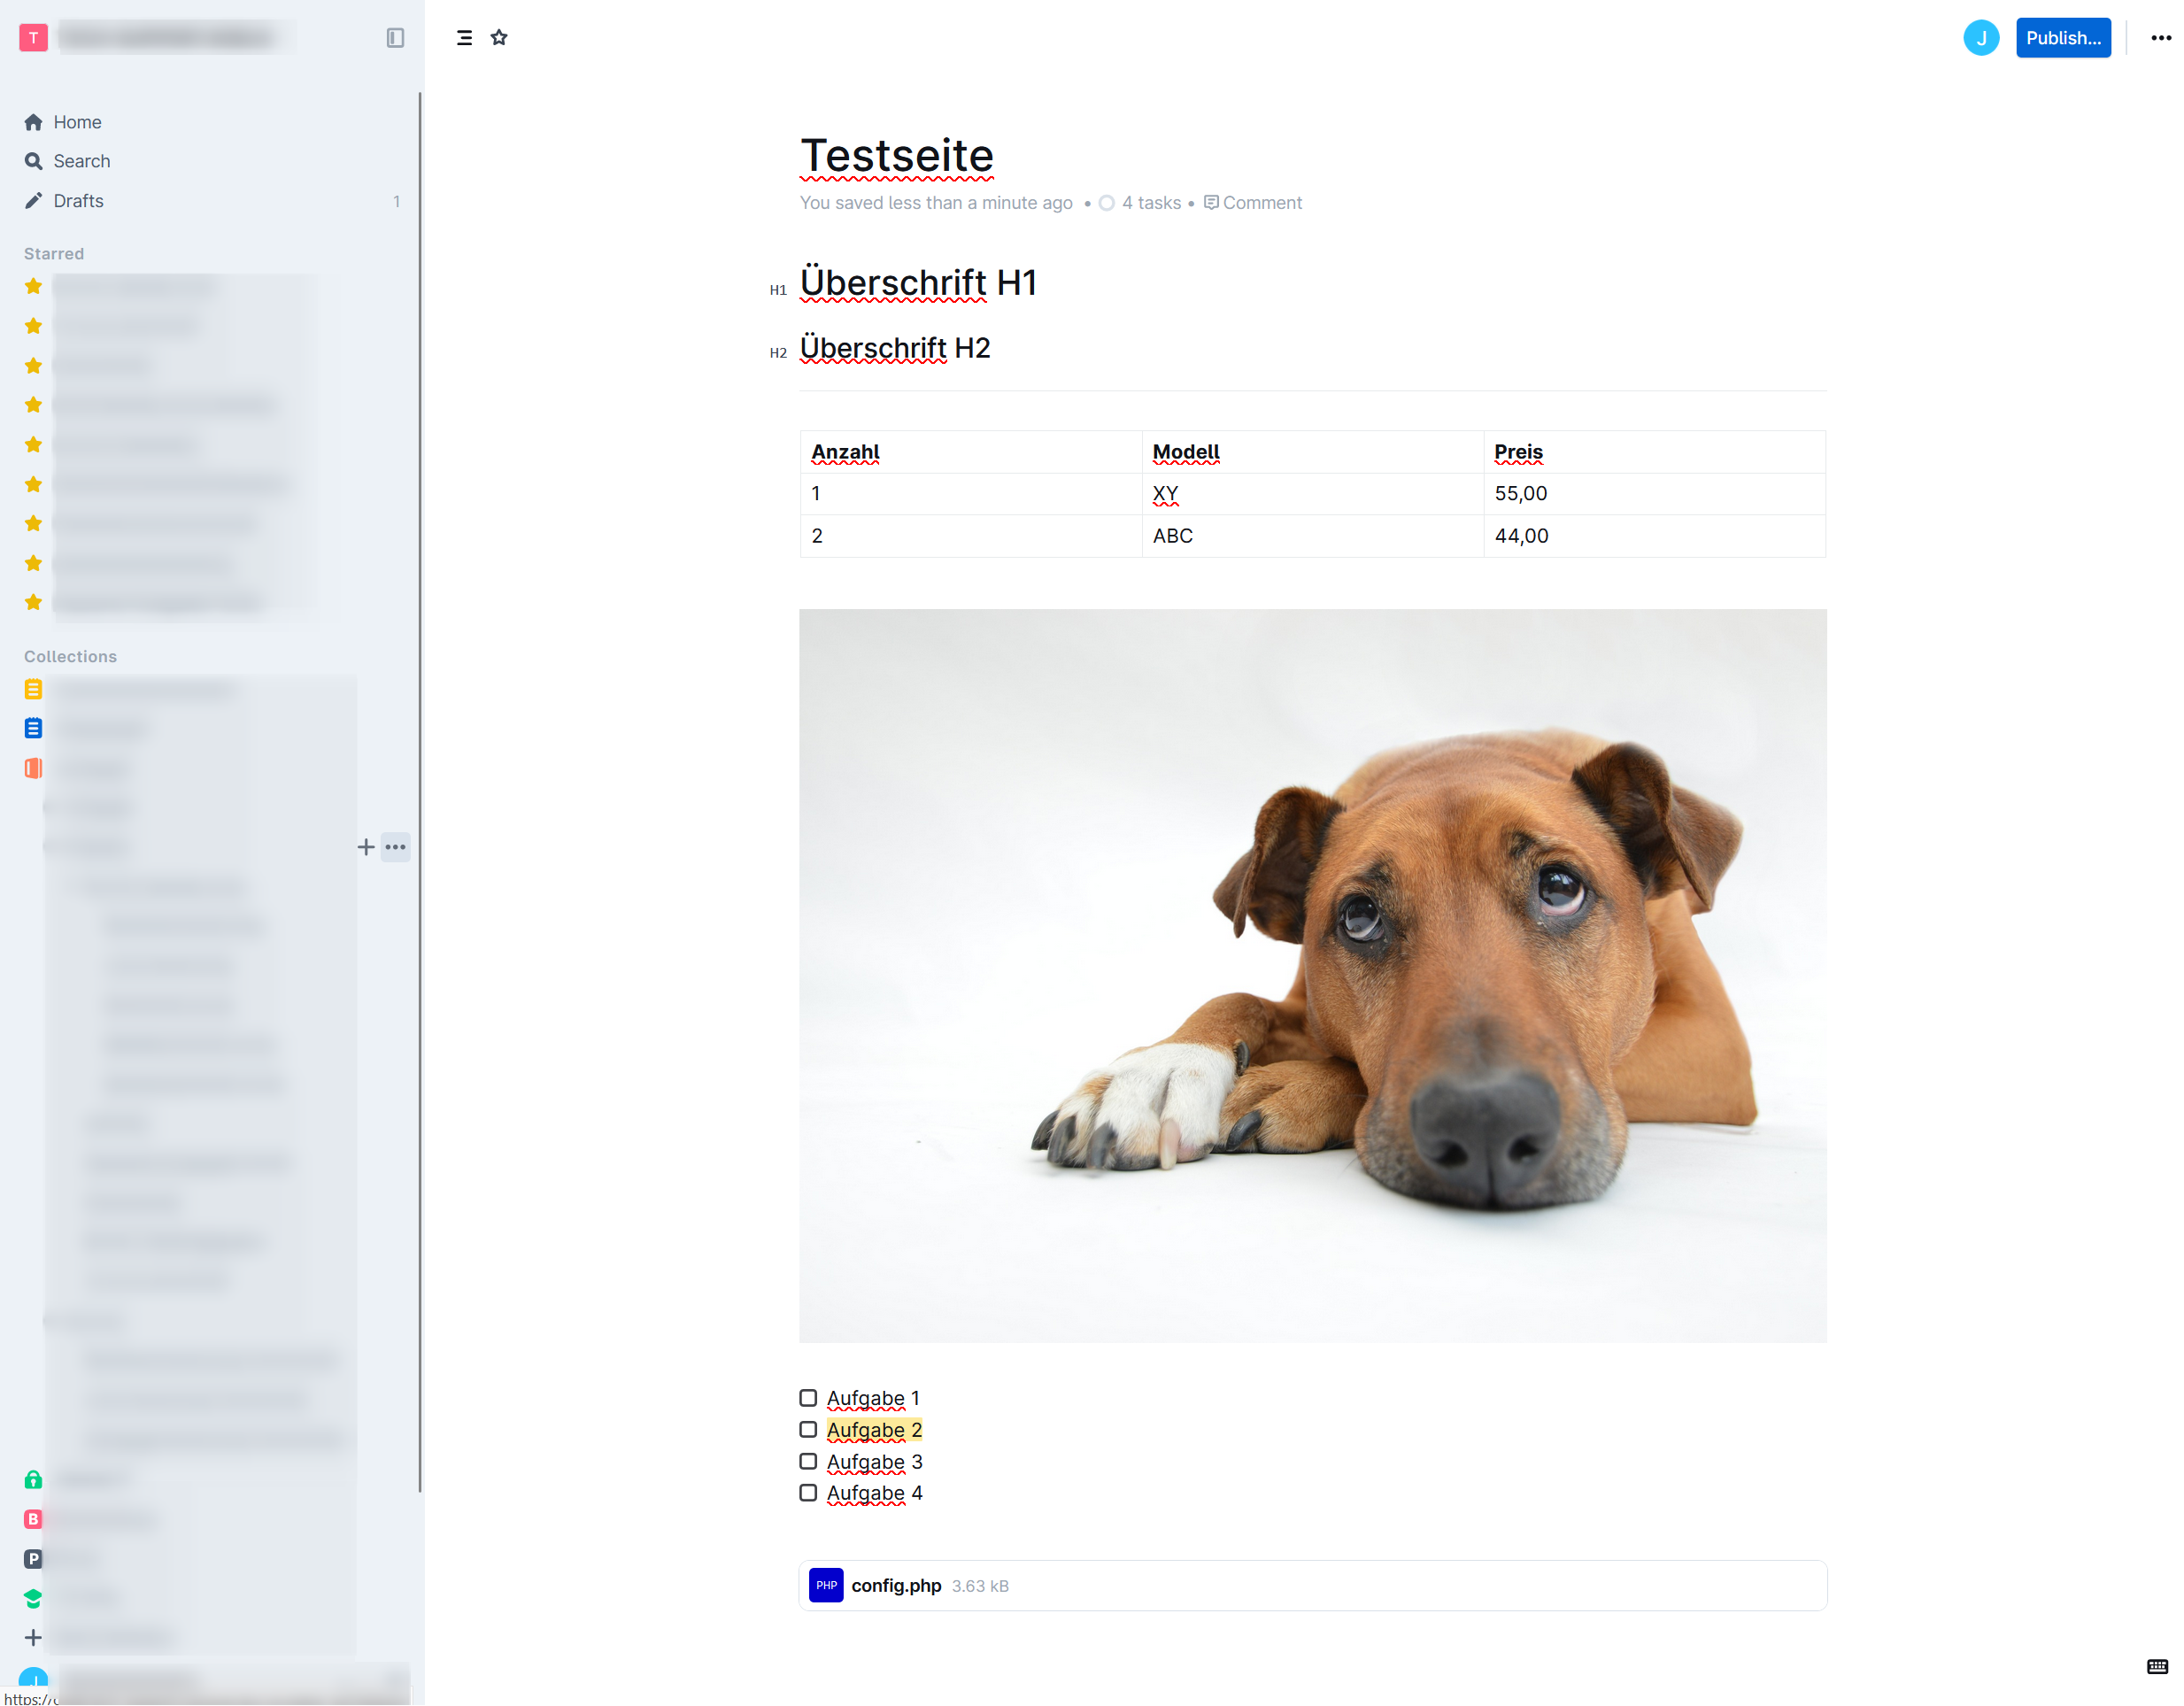
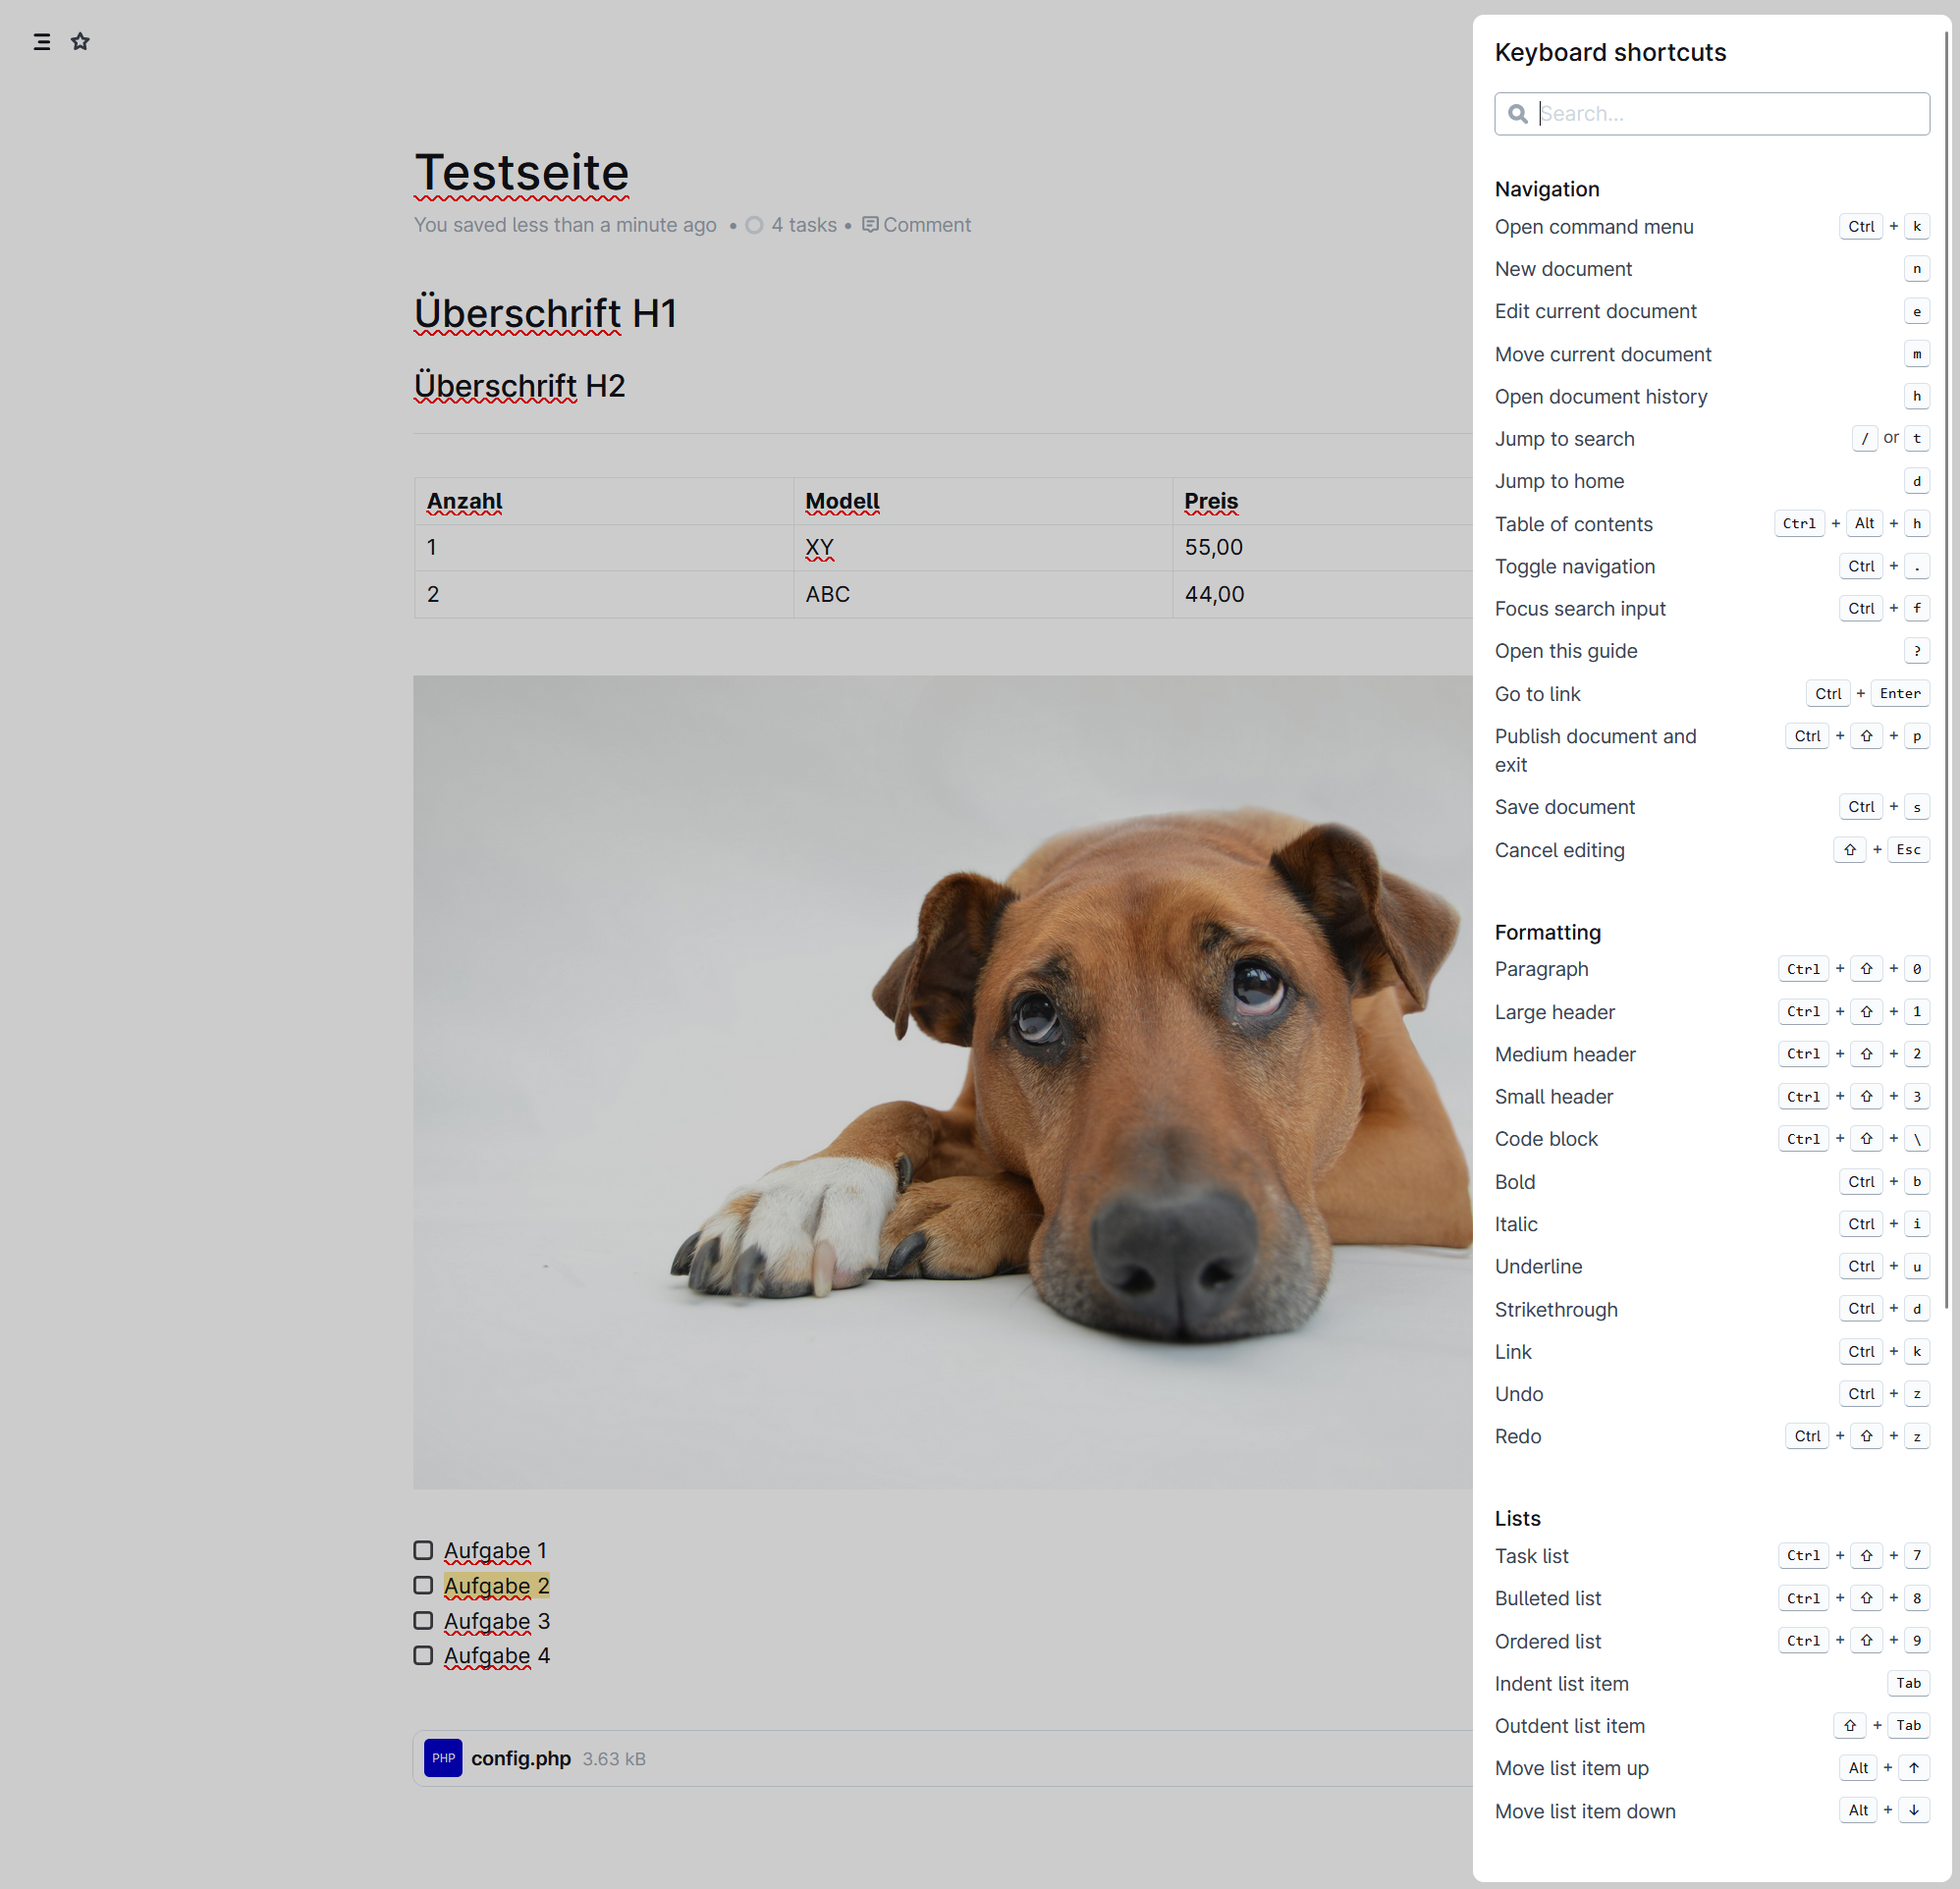
- Die Möglichkeit Texte, Tabellen, Aufzählungen, Task-List zu erstellen und Bilder sowie PDF-Dateien einzufügen
Aufbau und Nutzung von Outline
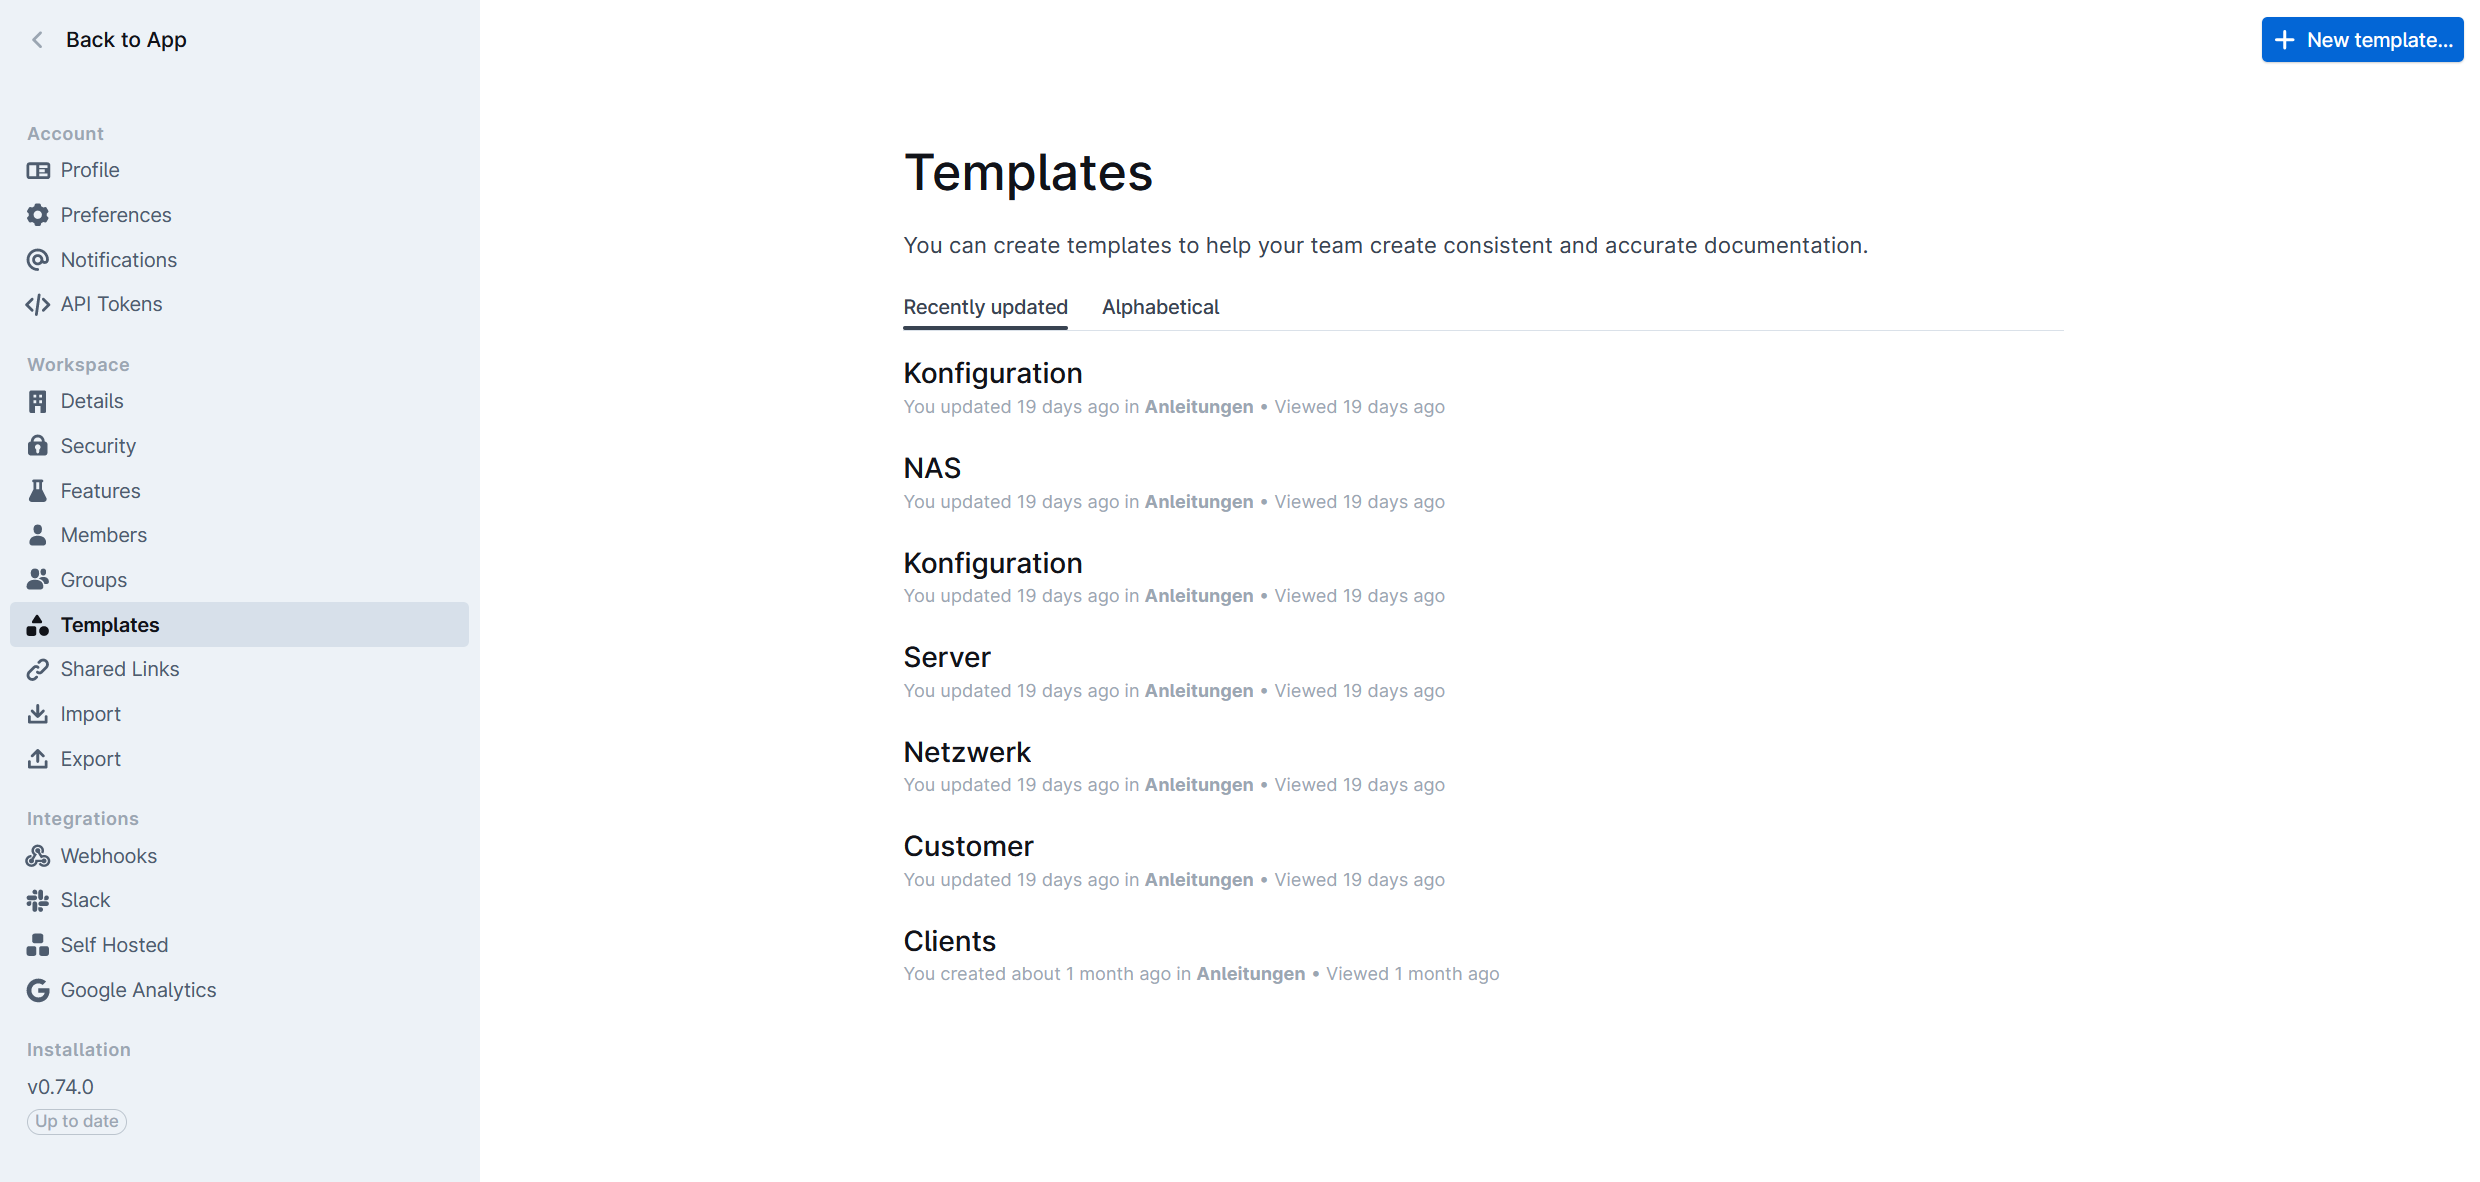
Die einzelnen Themengebiete können in Collections unterteilt werden. Dabei kann man den Zugriff auf eine Collection auf User oder Gruppen beschränken. Dadurch ist es möglich, Collections für Abteilungen anzulegen oder auch eine eigene Collection nur für sich zu erstellen.
Die Collections wiederum können beliebig viele Seiten und Unterseiten enthalten. Dadurch ist es möglich eine gute Strukur aufzubauen, die es ermöglich durch die einzelnen Themengebiete effizient zu navigieren.
Jede Seite verfügt automatisch über eine History die als Versionierung dient. Damit kann man auf ältere Versionen der Seite jederzeit zugreifen und Änderungen rückgängig machen.
Auch der Download von Seiten ist im HTML oder Markdown Format möglich. Dadurch lässt sich das Wiki exportieren.
Die Zusammenarbeit wird durch eine Kommentarfunktion und automatische Benachrichtigung bei Änderungen auch in größeren Teams möglich und man hat stets den Überblick über die selbst erstellen Seiten wie auch Seiten von anderen, die man abonieren kann.
Arbeiten zwei Mitarbeiter gleichzeitig an der gleichen Seite, wird der Cursor des anderen an der Stelle angezeigt, an der er gerade Tippt.
Vorwort zur Self-Hosted Installation (Stand 21.06.2024)
Die Preise variieren nach Funktionsumfang. Es gibt eine Community, Business, und Enterprise Version.
Seit Version 0.69 benötigt Outline keinen S3 Speicher mehr. Daher verzichte ich in diesem Tutorial auf den Einsatz von Minio.
Outline bringt keine eigenen Login Möglichkeit mit und setzt zur Authentication auf SSO, OIDC und SAML. Demnach müssten wir Google, Microsoft, Slack oder Gitlab nutzen oder unseren eigenen SSO Dienst lokal hosten.
Jedoch gibt es die Möglichkeit sich per CLI einen User mit E-Mail login zu erstellen. Mit diesem Link kann man sich anmelden. Benötigt man einen neuen Anmeldelink, geht das ab dann über den Button "Continue with Email" auf der Startseite. Dafür müssen jedoch die SMTP Einstellungen in der docker.env eingerichtet sein.
Bei dieser Methode, die von Outline selbst nur für den Developer Mode vorgesehen ist, kommt es jedoch nach einem Update zu einer Fehlermeldung beim starten des Docker Containers. Daher müssen wir per pgAdmin die Datenbank anpassen.
Wir installieren gleichzeitig Draw.io mit, da sich Zeichnungen von Draw.io in Outline anzeigen lassen.
Vorbreitungen
- Server mit Ubuntu 22.04
- SSH Login
To-Do-Liste
- Installation und Konfiguration von Nginx
- Installation von Docker, Docker-Compose
- Konfiguration von Outline via docker-compose.yml
- Konfiguration von Draw.io via docker-compose.yml
- Installation und Konfiguration von pgAdmin
- Konfiguration von Crontab
Installationsanleitung Outline und Draw.io via Docker
Zuerst installieren wir Nginx.
apt install nginxWir wechseln zum Nginx Verzeichnis und erstellen die Konfigurationsdatei für Outline.
cd /etc/nginx/sites-enabled
nano outline.conf
In die geöffnete Konfigurationsdatei kopieren wir die Nginx Einstellungen und ändern <your-server.url> mit der eigenen Domain, Bsp: outline.contoso.com
server {
    listen 80;
    server_name outline.<your-server.url>;
    rewrite ^ https://$server_name$request_uri? permanent;
}

server {
    listen 443 http2 ssl;
    server_name outline.<your-server.url>;

    # certificate locations
    ssl_certificate /etc/ssl/certs/outline.crt;
    ssl_certificate_key /etc/ssl/private/outline.key;

    ssl_session_timeout 1d;
    ssl_session_cache shared:SSL:50m;
    ssl_session_tickets off;
    ssl_protocols TLSv1.3 TLSv1.2;
    ssl_ciphers 'TLS-CHACHA20-POLY1305-SHA256:TLS-AES-256-GCM-SHA384:ECDHE-RSA-AES256-GCM-SHA512:DHE-RSA-AES256-GCM-SHA512:ECDHE-RSA-AES256-GCM-SHA384:DHE-RSA-AES256-GCM-SHA384';
    ssl_ecdh_curve X448:secp521r1:secp384r1;
    ssl_prefer_server_ciphers on;

    client_max_body_size 1G;
    client_body_timeout 3600s;
    client_body_buffer_size 512k;

    gzip on;
    gzip_vary on;
    gzip_comp_level 4;
    gzip_min_length 256;
    gzip_proxied expired no-cache no-store private no_last_modified no_etag auth;
    gzip_types application/atom+xml application/javascript application/json application/ld+json application/manifest+json application/rss+xml application/vnd.geo+json application/vnd.ms-fontobject application/wasm application/>

    add_header Strict-Transport-Security "max-age=31536000; includeSubDomains; preload" always;
    add_header Referrer-Policy "no-referrer" always;
    add_header Permissions-Policy "interest-cohort=(), geolocation=(),midi=(),sync-xhr=(),microphone=(),camera=(),magnetometer=(),gyroscope=(),fullscreen=(self),payment=()";
    add_header X-Download-Options "noopen" always;
    add_header X-Permitted-Cross-Domain-Policies "none" always;
    add_header X-Robots-Tag "noindex, nofollow" always;
    add_header X-XSS-Protection "1; mode=block" always;
    add_header X-Frame-Options "SAMEORIGIN" always;
    add_header X-Content-Type-Options "nosniff" always;

    # Outline
    location / {
        proxy_set_header Upgrade $http_upgrade;
        proxy_set_header Connection "Upgrade";
        proxy_set_header Host $host;

        proxy_set_header X-Forwarded-For $proxy_add_x_forwarded_for;
        proxy_set_header Host $host;
        proxy_set_header Host $http_host;
        proxy_set_header X-Real-IP $remote_addr;
        proxy_set_header X-Scheme $scheme;
        proxy_set_header X-Forwarded-Proto $scheme;
        proxy_redirect off;
        # Set to the correct ports for Outline
        proxy_pass http://127.0.0.1:3000;
    }
}
Wir erstellen auch direkt für Draw.io die Nginx Konfiguration:
nano draw.confUnd ändern <your-server.url> mit der eigenen Domain. Bsp: draw.contoso.com
server {
     listen [::]:80;
     listen 80;

     server_name draw.<your-server.url>;

     return 301 https://draw.<your-server.url>$request_uri;
 }

 server {
     listen [::]:443 http2 ssl;
     listen 443 http2 ssl;

     server_name draw.<your-server.url>;
     ssl_session_timeout  5m;
     ssl_certificate /etc/ssl/certs/draw.crt;
     ssl_certificate_key /etc/ssl/private/draw.key;

    ssl_session_cache shared:SSL:50m;
    ssl_session_tickets off;
    ssl_protocols TLSv1.3 TLSv1.2;
    ssl_ciphers 'TLS-CHACHA20-POLY1305-SHA256:TLS-AES-256-GCM-SHA384:ECDHE-RSA-AES256-GCM-SHA512:DHE-RSA-AES256-GCM-SHA512:ECDHE-RSA-AES256-GCM-SHA384:DHE-RSA-AES256-GCM-SHA384';
    ssl_ecdh_curve X448:secp521r1:secp384r1;
    ssl_prefer_server_ciphers on;

    client_max_body_size 1G;
    client_body_timeout 3600s;
    client_body_buffer_size 512k;

    gzip on;
    gzip_vary on;
    gzip_comp_level 4;
    gzip_min_length 256;
    gzip_proxied expired no-cache no-store private no_last_modified no_etag auth;
    gzip_types application/atom+xml application/javascript application/json application/ld+json application/manifest+json application/rss+xml application/vnd.geo+json application/vnd.ms-fontobject application/wasm application/>

    add_header Strict-Transport-Security "max-age=31536000; includeSubDomains; preload" always;
    add_header Referrer-Policy "no-referrer" always;
    add_header Permissions-Policy "interest-cohort=(), geolocation=(),midi=(),sync-xhr=(),microphone=(),camera=(),magnetometer=(),gyroscope=(),fullscreen=(self),payment=()";
    add_header X-Download-Options "noopen" always;
    add_header X-Permitted-Cross-Domain-Policies "none" always;
    add_header X-Robots-Tag "noindex, nofollow" always;
    add_header X-XSS-Protection "1; mode=block" always;
    add_header X-Frame-Options "SAMEORIGIN" always;
    add_header X-Content-Type-Options "nosniff" always;

     location / {
         proxy_set_header X-Forwarded-Host $host;
         proxy_set_header X-Forwarded-Server $host;
         proxy_set_header X-Forwarded-For $proxy_add_x_forwarded_for;
         proxy_pass https://localhost:8443;
         client_max_body_size 100M;
     }
 }
Wir wechseln zum /tmp Verzeichnis und erstellen ein selbstsigniertes SSL Zertifikat. Alternativ kann natürlich auch Certbot mit Let's Encryption genutzt werden.
Wir brauchen ein Zertifikat für Outline und eins für Draw.io und geben als Laufzeit 3650 Tage an, also 10 Jahre.
Bei der Frage "Common Name (e.g. server FQDN or YOUR name) []:" geben wir die eigene Domain an!
cd /tmp
openssl req -newkey rsa:4096 \
            -x509 \
            -sha256 \
            -days 3650 \
            -nodes \
            -out outline.crt \
            -keyout outline.key
openssl req -newkey rsa:4096 \
-x509 \
-sha256 \
-days 3650 \
-nodes \
-out draw.crt \
-keyout draw.keyWir verschieben die outline.crt Datei nach /etc/ssl/certs und die Datei outline.key nach /etc/ssl/private.
mv outline.crt /etc/ssl/certs
mv outline.key /etc/ssl/private
mv draw.crt /etc/ssl/certs
mv draw.key /etc/ssl/private
Abschließend testen wir die Nginx Konfiguration und starten Nginx neu, sofern wir keine Fehlermeldung sehen.
Nginx sollte folgendes zurückmelden auf nginx -t:
nginx: the configuration file /etc/nginx/nginx.conf syntax is ok
nginx: configuration file /etc/nginx/nginx.conf test is successful
nginx -t
service nginx restart
Installation Docker, Docker-Compose
Docker and Docker-Compose installieren:
apt-get install docker.io -y
apt-get install docker-compose -y
Einrichten von Outline via docker-compose.yml
Für Outline erstellen wir das Verzeichnis /opt/outline und wechseln auch gleich in das Verzeichnis:
cd /opt && mkdir outline && cd outlineFür die PostgreSQL Datenbank benötigen wir ein Passwort, welches wir uns jetzt schon generieren und in die Zwischenablage für später kopieren:
openssl rand -hex 32Anschließend erstelle wir die docker-compose.yml Datei und ändern <my-postgres-password>, <your-password> sowie <your-email>.
nano docker-compose.ymlversion: "3.2"
services:
outline:
image: docker.getoutline.com/outlinewiki/outline:latest
env_file: ./docker.env
ports:
- "3000:3000"
volumes:
- storage-data:/var/lib/outline/data
depends_on:
- postgres
- redis
redis:
image: redis
env_file: ./docker.env
ports:
- "6379:6379"
volumes:
- ./redis.conf:/redis.conf
command: ["redis-server", "/redis.conf"]
healthcheck:
test: ["CMD", "redis-cli", "ping"]
interval: 10s
timeout: 30s
retries: 3
postgres:
image: postgres
env_file: ./docker.env
ports:
- "5432:5432"
volumes:
- database-data:/var/lib/postgresql/data
healthcheck:
test: ["CMD", "pg_isready"]
interval: 30s
timeout: 20s
retries: 3
environment:
POSTGRES_USER: 'outline'
POSTGRES_PASSWORD: '<my-postgres-password>'
POSTGRES_DB: 'outline'
pgadmin:
image: dpage/pgadmin4
container_name: pgadmin4
restart: always
ports:
- "8888:80"
volumes:
- pgadmin-data:/var/lib/pgadmin
healthcheck:
test: ["CMD", "wget", "-O", "-", "http://localhost:8888/misc/ping"]
interval: 10s
timeout: 10s
start_period: 160s
retries: 3
environment:
PGADMIN_DEFAULT_EMAIL: <your-email>
PGADMIN_DEFAULT_PASSWORD: <your-password>
volumes:
storage-data:
database-data:
pgadmin-data:Jetzt erstellen wir mit openssl zwei 32 Zeichen lange keys und speicheren diese temporär ab.
openssl rand -hex 32Anschließend erstellen wir die docker.env Datei:
nano docker.envund ändern <my-openssl-key1>, <my-openssl-key2>, <my-postgres-password>, <my-domain> sowie die SMTP Werte für den E-Mail Versand.
Default_Language ändern wir von us_US auf de_DE, damit die Benutzer die deutsche Sprache voreingestellt haben.
Für den Wert WEB_CONCURRENCY=4 beachten wir den Hinweis in der Konfigurationsdatei "How many processes should be spawned. As a reasonable rule divide your servers available memory by 512 for a rough estimate"
Ich habe den Wert von 1 auf 4 verändert.
# –––––––––––––––– REQUIRED ––––––––––––––––

NODE_ENV=production

# Generate a hex-encoded 32-byte random key. You should use `openssl rand -hex 32`
# in your terminal to generate a random value.
SECRET_KEY=<my-openssl-key1>

# Generate a unique random key. The format is not important but you could still use
# `openssl rand -hex 32` in your terminal to produce this.
UTILS_SECRET=<my-openssl-key2>

# For production point these at your databases, in development the default
# should work out of the box.
DATABASE_URL=postgres://outline:<my-postgres-password>@postgres:5432/outline
DATABASE_URL_TEST=postgres://outline:<my-postgres-password>@postgres:5432/outline-test
DATABASE_CONNECTION_POOL_MIN=
DATABASE_CONNECTION_POOL_MAX=
# Uncomment this to disable SSL for connecting to Postgres
PGSSLMODE=disable

# For redis you can either specify an ioredis compatible url like this
REDIS_URL=redis://redis:6379
# or alternatively, if you would like to provide additional connection options,
# use a base64 encoded JSON connection option object. Refer to the ioredis documentation
# for a list of available options.
# Example: Use Redis Sentinel for high availability
# {"sentinels":[{"host":"sentinel-0","port":26379},{"host":"sentinel-1","port":26379}],"name":"mymaster"}
# REDIS_URL=ioredis://eW50aW5lt7Imhvc3QiOiJz

# URL should point to the fully qualified, publicly accessible URL. If using a
# proxy the port in URL and PORT may be different.
URL=https://outline.<my-domain>

# See [documentation](docs/SERVICES.md) on running a separate collaboration
# server, for normal operation this does not need to be set.
COLLABORATION_URL=

# To support uploading of images for avatars and document attachments an
# s3-compatible storage must be provided. AWS S3 is recommended for redundancy
# however if you want to keep all file storage local an alternative such as
# minio (https://github.com/minio/minio) can be used.

# A more detailed guide on setting up S3 is available here:
# => https://wiki.generaloutline.com/share/125de1cc-9ff6-424b-8415-0d58c809a40f
#
AWS_ACCESS_KEY_ID=get_a_key_from_aws
AWS_SECRET_ACCESS_KEY=get_the_secret_of_above_key
AWS_REGION=xx-xxxx-x
AWS_S3_ACCELERATE_URL=
AWS_S3_UPLOAD_BUCKET_URL=http://s3:4569
AWS_S3_UPLOAD_BUCKET_NAME=bucket_name_here
AWS_S3_FORCE_PATH_STYLE=true
AWS_S3_ACL=private

# Specify what storage system to use. Possible value is one of "s3" or "local".
# For "local", the avatar images and document attachments will be saved on local disk.
FILE_STORAGE=local

# If "local" is configured for FILE_STORAGE above, then this sets the parent directory under
# which all attachments/images go. Make sure that the process has permissions to create
# this path and also to write files to it.
FILE_STORAGE_LOCAL_ROOT_DIR=/var/lib/outline/data

# Maximum allowed size for the uploaded attachment.
FILE_STORAGE_UPLOAD_MAX_SIZE=52428800

# Override the maximum size of document imports, generally this should be lower
# than the document attachment maximum size.
FILE_STORAGE_IMPORT_MAX_SIZE=52428800

# Override the maximum size of workspace imports, these can be especially large
# and the files are temporary being automatically deleted after a period of time.
FILE_STORAGE_WORKSPACE_IMPORT_MAX_SIZE=52428800

# –––––––––––––– AUTHENTICATION ––––––––––––––

# Third party signin credentials, at least ONE OF EITHER Google, Slack,
# or Microsoft is required for a working installation or you'll have no sign-in
# options.

# To configure Slack auth, you'll need to create an Application at
# => https://api.slack.com/apps
#
# When configuring the Client ID, add a redirect URL under "OAuth & Permissions":
# https://<URL>/auth/slack.callback
SLACK_CLIENT_ID=get_a_key_from_slack
SLACK_CLIENT_SECRET=get_the_secret_of_above_key

# To configure Google auth, you'll need to create an OAuth Client ID at
# => https://console.cloud.google.com/apis/credentials
#
# When configuring the Client ID, add an Authorized redirect URI:
# https://<URL>/auth/google.callback
GOOGLE_CLIENT_ID=
GOOGLE_CLIENT_SECRET=

# To configure Microsoft/Azure auth, you'll need to create an OAuth Client. See
# the guide for details on setting up your Azure App:
# => https://wiki.generaloutline.com/share/dfa77e56-d4d2-4b51-8ff8-84ea6608faa4
AZURE_CLIENT_ID=
AZURE_CLIENT_SECRET=
AZURE_RESOURCE_APP_ID=

# To configure generic OIDC auth, you'll need some kind of identity provider.
# See documentation for whichever IdP you use to acquire the following info:
# Redirect URI is https://<URL>/auth/oidc.callback
OIDC_CLIENT_ID=
OIDC_CLIENT_SECRET=
OIDC_AUTH_URI=
OIDC_TOKEN_URI=
OIDC_USERINFO_URI=

# Specify which claims to derive user information from
# Supports any valid JSON path with the JWT payload
OIDC_USERNAME_CLAIM=preferred_username

# Display name for OIDC authentication
OIDC_DISPLAY_NAME=OpenID Connect

# Space separated auth scopes.
OIDC_SCOPES=openid profile email


# –––––––––––––––– OPTIONAL ––––––––––––––––

# Base64 encoded private key and certificate for HTTPS termination. This is only
# required if you do not use an external reverse proxy. See documentation:
# https://wiki.generaloutline.com/share/1c922644-40d8-41fe-98f9-df2b67239d45
SSL_KEY=
SSL_CERT=

# If using a Cloudfront/Cloudflare distribution or similar it can be set below.
# This will cause paths to javascript, stylesheets, and images to be updated to
# the hostname defined in CDN_URL. In your CDN configuration the origin server
# should be set to the same as URL.
CDN_URL=

# Auto-redirect to https in production. The default is true but you may set to
# false if you can be sure that SSL is terminated at an external loadbalancer.
FORCE_HTTPS=true

# Have the installation check for updates by sending anonymized statistics to
# the maintainers
ENABLE_UPDATES=true

# How many processes should be spawned. As a reasonable rule divide your servers
# available memory by 512 for a rough estimate
WEB_CONCURRENCY=4

# Override the maximum size of document imports, could be required if you have
# especially large Word documents with embedded imagery
# 262144000 = 250 MB
MAXIMUM_IMPORT_SIZE=262144000

# You can remove this line if your reverse proxy already logs incoming http
# requests and this ends up being duplicative
DEBUG=http

# Configure lowest severity level for server logs. Should be one of
# error, warn, info, http, verbose, debug and silly
LOG_LEVEL=info

# For a complete Slack integration with search and posting to channels the
# following configs are also needed, some more details
# => https://wiki.generaloutline.com/share/be25efd1-b3ef-4450-b8e5-c4a4fc11e02a
#
SLACK_VERIFICATION_TOKEN=your_token
SLACK_APP_ID=A0XXXXXXX
SLACK_MESSAGE_ACTIONS=true

# Optionally enable google analytics to track pageviews in the knowledge base
GOOGLE_ANALYTICS_ID=

# Optionally enable Sentry (sentry.io) to track errors and performance,
# and optionally add a Sentry proxy tunnel for bypassing ad blockers in the UI:
# https://docs.sentry.io/platforms/javascript/troubleshooting/#using-the-tunnel-option)
SENTRY_DSN=
SENTRY_TUNNEL=

# To support sending outgoing transactional emails such as "document updated" or
# "you've been invited" you'll need to provide authentication for an SMTP server
SMTP_HOST=<smtp-server-adress>
SMTP_PORT=587
SMTP_USERNAME=<my-mail-adress>
SMTP_PASSWORD=<my-mail-password>Y
SMTP_FROM_EMAIL=<my-mail-adress>
SMTP_REPLY_EMAIL=<my-mail-adress>
SMTP_TLS_CIPHERS=TLS_AES_256_GCM_SHA384
SMTP_SECURE=false

# The default interface language. See translate.getoutline.com for a list of
# available language codes and their rough percentage translated.
DEFAULT_LANGUAGE=de_DE

# Optionally enable rate limiter at application web server
RATE_LIMITER_ENABLED=true

# Configure default throttling parameters for rate limiter
RATE_LIMITER_REQUESTS=1000
RATE_LIMITER_DURATION_WINDOW=60

# Iframely API config
# IFRAMELY_URL=
# IFRAMELY_API_KEY=

# Enable unsafe-inline in script-src CSP directive
# Setting it to true allows React dev tools add-on in
# Firefox to successfully detect the project
DEVELOPMENT_UNSAFE_INLINE_CSP=false
Datenbank erstellen und docker starten:
Sollte die Datenbank Migration zunächst mit einem Fehler beenden, kann man diese einfach noch mal ausführen. Bei mir hat es nach dem 2. Mal ohne Fehler funktioniert.
docker-compose run --rm outline yarn db:migrate --env=production-ssl-disabled
docker-compose up -d
Nun erstellen wir für Draw.io ein Verzeichnis und erstellen die docker-compose.yml Datei:
mkdir /opt/draw && cd /opt/draw
nano docker-compose.yml
Und fügen folgendes in die docker-compose.yml Datei ein und ändern überall <your-domain> mit der eigenen Domain.
version: '3'
services:
  plantuml-server:
    image: plantuml/plantuml-server
    expose:
      - "8080"
    networks:
      - drawionet
    volumes:
      - fonts_volume:/usr/share/fonts/drawio
  image-export:
    image: jgraph/export-server
    expose:
      - "8000"
    networks:
      - drawionet
    volumes:
      - fonts_volume:/usr/share/fonts/drawio
    environment:
      - DRAWIO_BASE_URL=https://draw.<your-domain>
  drawio:
    image: jgraph/drawio
    ports:
      - "8443:8443"
      - "8080:8080"
    links:
      - plantuml-server:plantuml-server
      - image-export:image-export
    depends_on:
      - plantuml-server
      - image-export
    networks:
      - drawionet
    environment:
      - DRAWIO_SELF_CONTAINED=1
      - PLANTUML_URL=https://draw.<your-domain>
      - EXPORT_URL=https://draw.<your-domain>
      - DRAWIO_BASE_URL=https://draw.<your-domain>
      - DRAWIO_SERVER_URL=https://draw.<your-domain>
      - DRAWIO_CSP_HEADER=${DRAWIO_CSP_HEADER}
      - DRAWIO_VIEWER_URL=https://draw.<your-domain>/js/viewer.min.js
      - DRAWIO_LIGHTBOX_URL=https://draw.<your-domain>
      - DRAWIO_CONFIG=${DRAWIO_CONFIG}
      - DRAWIO_GOOGLE_CLIENT_ID=${DRAWIO_GOOGLE_CLIENT_ID}
      - DRAWIO_GOOGLE_APP_ID=${DRAWIO_GOOGLE_APP_ID}
      - DRAWIO_GOOGLE_CLIENT_SECRET=${DRAWIO_GOOGLE_CLIENT_SECRET}
      - DRAWIO_GOOGLE_VIEWER_CLIENT_ID=${DRAWIO_GOOGLE_VIEWER_CLIENT_ID}
      - DRAWIO_GOOGLE_VIEWER_APP_ID=${DRAWIO_GOOGLE_VIEWER_APP_ID}
      - DRAWIO_GOOGLE_VIEWER_CLIENT_SECRET=${DRAWIO_GOOGLE_VIEWER_CLIENT_SECRET}
      - DRAWIO_MSGRAPH_CLIENT_ID=${DRAWIO_MSGRAPH_CLIENT_ID}
      - DRAWIO_MSGRAPH_CLIENT_SECRET=${DRAWIO_MSGRAPH_CLIENT_SECRET}
      - DRAWIO_MSGRAPH_TENANT_ID=${DRAWIO_MSGRAPH_TENANT_ID}
      - DRAWIO_GITLAB_ID=${DRAWIO_GITLAB_ID}
      - DRAWIO_GITLAB_SECRET=${DRAWIO_GITLAB_SECRET}
      - DRAWIO_GITLAB_URL=${DRAWIO_GITLAB_URL}
      - DRAWIO_CLOUD_CONVERT_APIKEY=${DRAWIO_CLOUD_CONVERT_APIKEY}

    healthcheck:
      test: ["CMD-SHELL", "curl -f https://draw.<your-domain> || exit 1"]
      interval: 1m30s
      timeout: 10s
      retries: 5
      start_period: 10s

networks:
  drawionet:

volumes:
  fonts_volume:
Und erstellen nun den ersten Outline User, der auch automatisch Admin ist, per CLI. <your-email-adress> müssen wir mit der eigenen E-Mail Adresse ersetzen. Die URL die im Anschluss angezeigt wird, müssen wir uns kopieren und im Webbrowser aufrufen. Wir sind direkt in Outline eingeloggt.
docker-compose run --rm outline node build/server/scripts/seed.js <your-email-adress>Nun starten wir auch den Docker-Container von Draw.io:
docker-compose up -dSetting up pgAdmin
Die Oberfläche von pgAdmin finden wir unter der Server-IP und dem Port 8888, also müssen wir http://<your-ip>:8888 in unserem Browser öffnen und loggen uns mit den zuvor in der docker-compose.yml angegebenen PGADMIN-DEFAULT-EMAIL und PGADMIN_DEFAULT_PASSWORD ein.
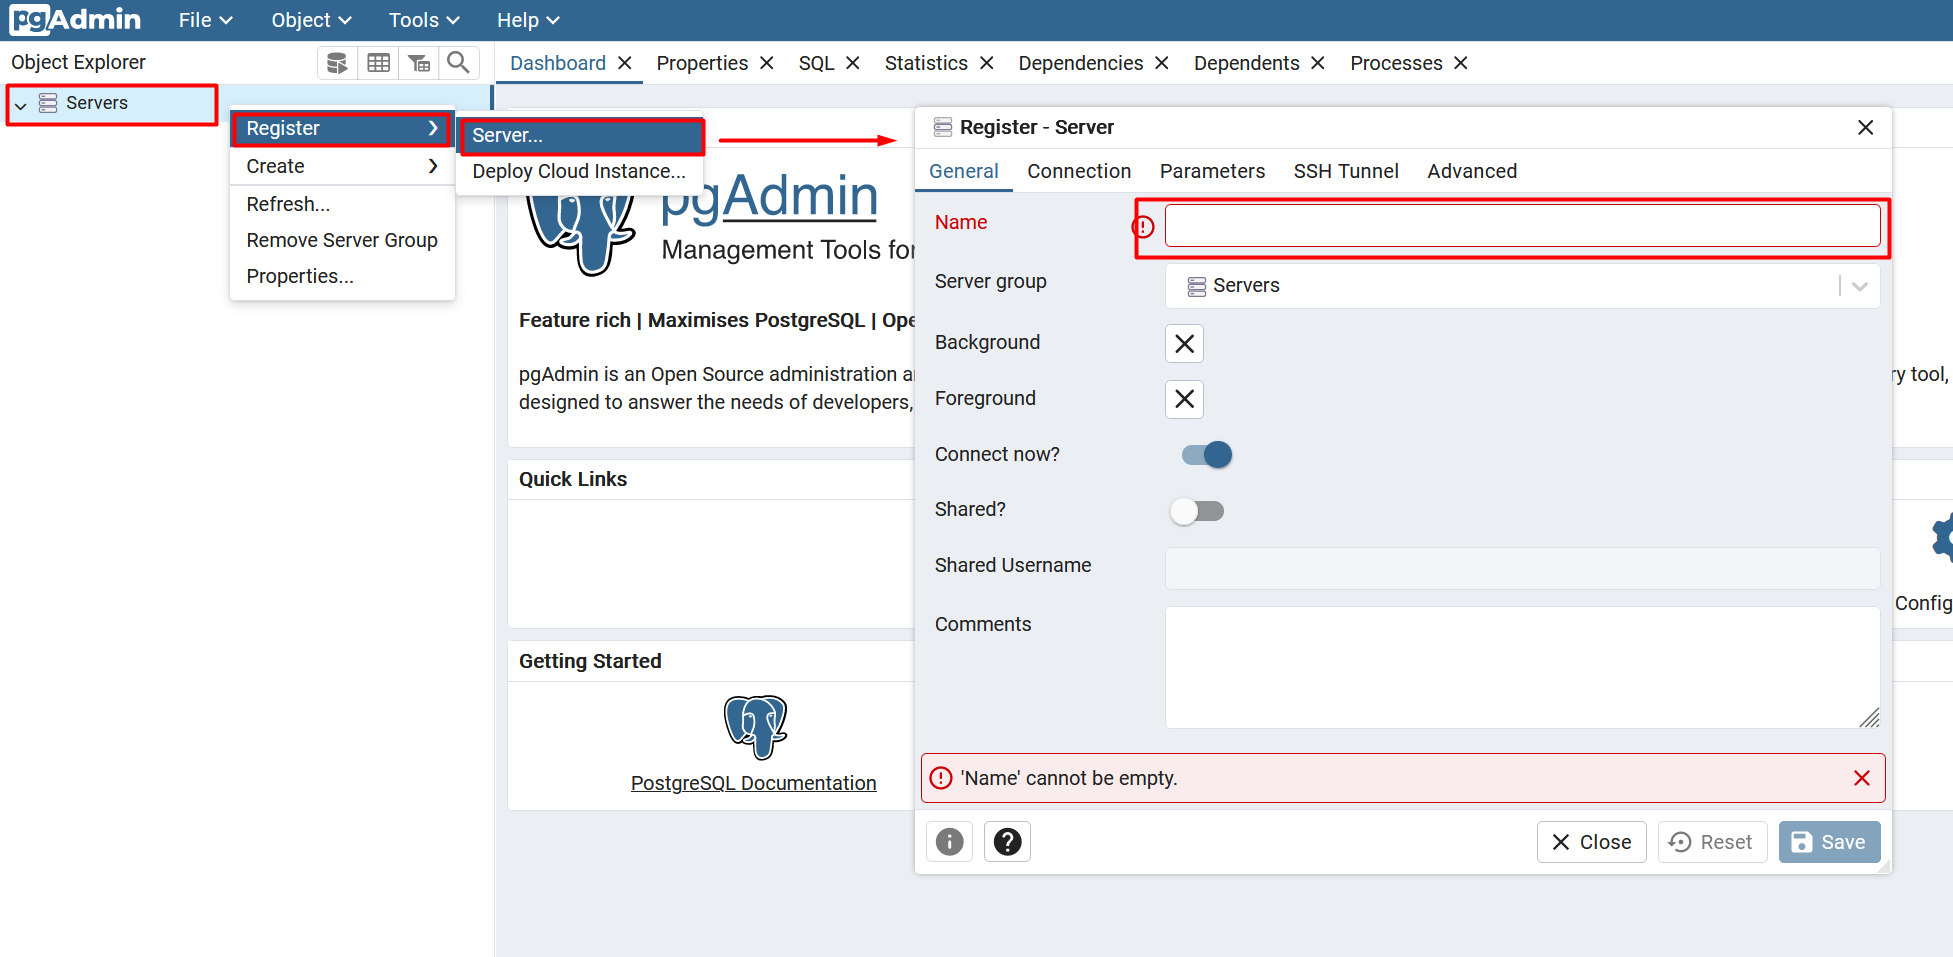
Als erstes müssen wir in pgAdmin die Datenbank verbinden. Dazu auf Server klicken, Register, Server und im neuen Fenster im Tab General einen Servernamen angeben. Dann im Tab Connection unter Host name/address postgres angeben. Der Port bleibt bei 5432. Maintenance database outline, Username outline und das eben in der docker-compose.yml angegebene postgres Datenbankpasswort einfügen.

Nun navigieren wir zu Servers > Outline > Database > outline > Schemas > Tables > Teams

Wir wechseln die Ansicht in pgAdmin und klicken auf die Tabelle.

Und kopieren uns die ID, welche im Format 291023123-asdf0921334-safd0234234 angezeigt wird und wechseln zu Tables -> authentication_providers und legen eine neue Zeile an.

Hier kopieren wir in die Spalte id, providerId und teamId die eben kopierte ID. In createdAt können wir folgenden Timestamp eintragen 2024-01-22 21:57:33.896+00 und als name können wir uns etwas ausdenken.

Nach dem speichern können wir pgAdmin verlassen.
Da wir pgAdmin nicht mehr brauchen, können wir pgAdmin aus der docker-compose.yml Datei ausklammern.
Crontab einrichten
Crontab öffnen:
crontab -eOutline Docker Container automatisch nach dem reboot starten:
# m h  dom mon dow   command
@reboot sleep 30 && cd /opt/outline/ && docker-compose up -d
@reboot sleep 60 && cd /opt/draw/ && docker-compose up -d
Erstelle einen täglichen Cronjob für Outline:
nano /etc/cron.daily/outline-dailyUnd fügen folgendes ein, dabei ändern wir <your-domain> und <UTILS_SECRET> mit dem Key aus der docker.env Konfigurationsdatei.
#!/bin/sh
curl https://${<your-domain>}/api/cron.daily?token=${<UTILS_SECRET>}
Anschließend machen wir das Script noch ausführbar:
chmod +x /etc/cron.daily/outline-dailyUpdates per Script installieren
Wir erstellen ein Script im Home Verzeichnis und gebe direkt die Berechtigung zum Ausführen:
cd /home && touch update.sh && chmod a+x update.sh && nano update.shUnd kopieren folgenden Inhalt hinein:
# Update-Script

# OS UPDATE
apt-get update
apt-get upgrade

# APPLICATION UPDATE

# Docker Outline
cd /opt/outline
docker-compose down --remove-orphans
docker pull outlinewiki/outline
docker-compose run --rm outline yarn --env=production-ssl-disabled
docker-compose up -d

# Docker draw
cd /opt/draw
docker-compose pull $1
docker-compose up -d --build $1
docker image prune

# REBOOT
read -p "Reboot System? " -n 1 -r
echo
if [[ $REPLY =~ ^[Yy]$ ]]
then
    /sbin/reboot
fi
Nun können wir ganz einfach durch Ausführen des Update Scripts das Betriebssystem und die Docker Container von Outline sowie Draw.io updaten. Anschließend Fragt uns das Script, ob wir neustarten wollen.
./home/update.shOutline Einstellungen
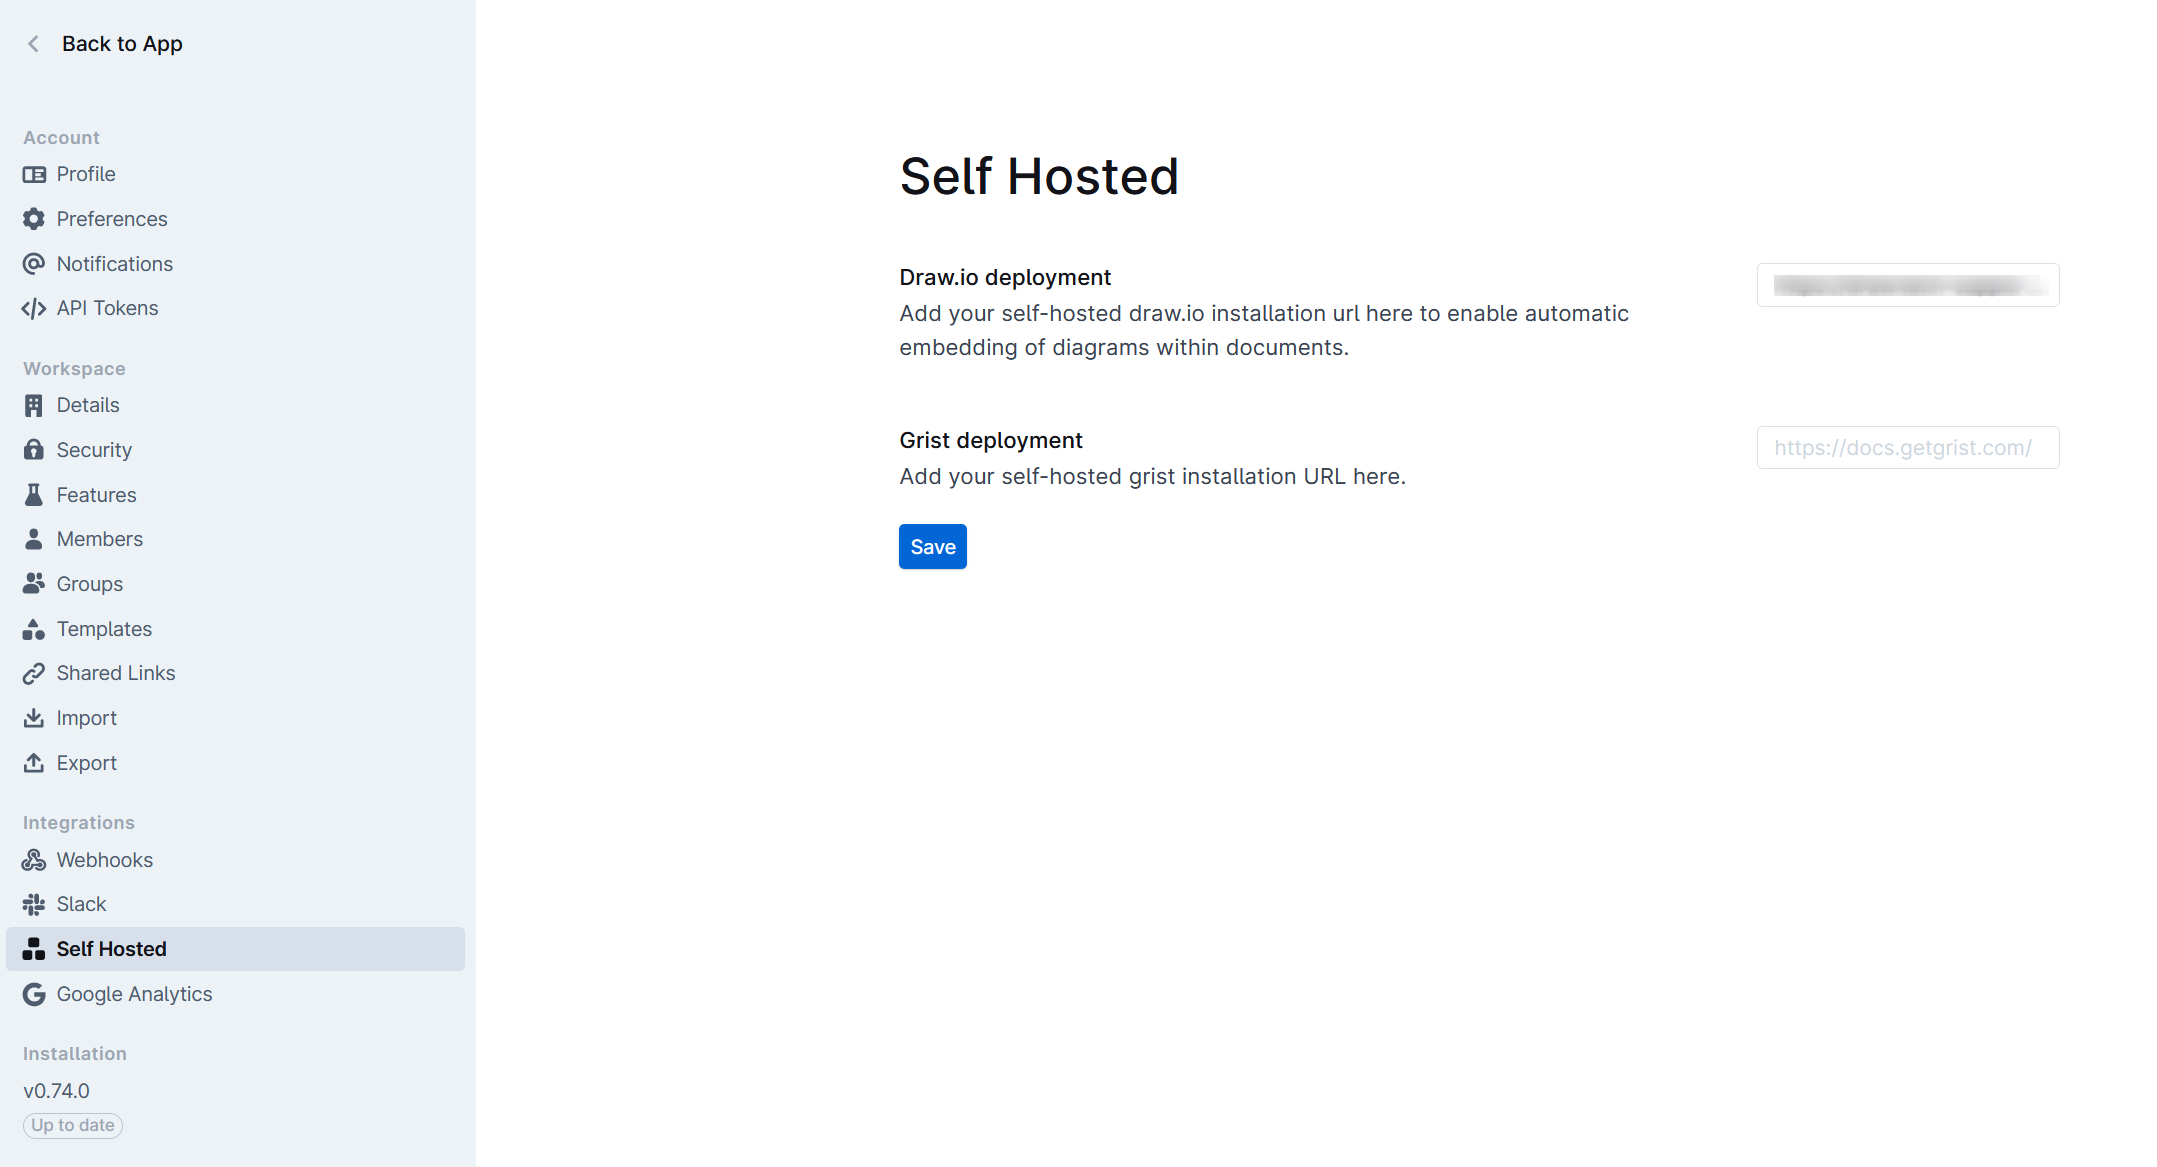
Nach dem ersten Login müssen wir in den Einstellungen noch unter Self Hosted unsere Domain für draw.io angeben, damit Zeichnungen auch auf dem lokalen Draw.io Server angezeigt werden.


Leave a comment